


Step-by-step barcode reader configuration
Do you need to configure a CLV600 series barcode reader? Fortunately, SICK’s family of barcode readers have the capability to compare barcodes taught into their memory with barcodes being scanned.
This procedure can assist any user who needs to implement the CLV600 series barcode reader into an application that requires identifying barcodes being scanned to a set value.
The following procedure is used to configure a CLV600 barcode reader for local code teach-in.
What hardware and software is required?
The hardware and software used for this procedure are:
- CLV600 Series Barcode Reader
- CDM420 or CDB620 – Connection Module
- CMC600-101 – External Memory Module
- Cable M12, 12-pin to CDM/CDB 15-pin D-Sub
- Cable M12, 4-pin to Host RJ45
- SICK Open Portal Application System – Engineering Tool (SOPAS-ET)
- Normally Opened Pushbutton
The configuration process
The following configuration example uses a CLV650 model barcode reader but the parameters used to set up the match code are identical for all CLV600 series barcode readers.
Drill into Parameter > Data Processing > Match-code teach-in
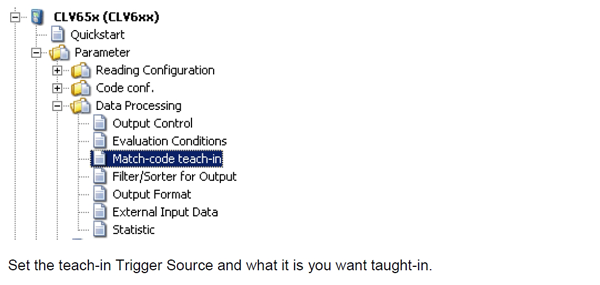
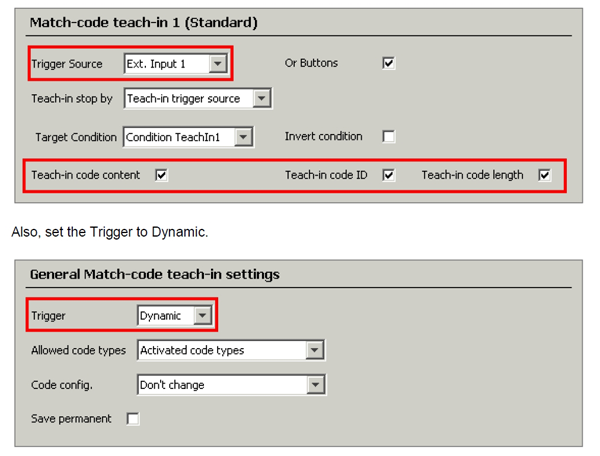
The setup above uses the CLV650 to teach-in a barcode's content, code-ID, and length to the evaluation condition “TeachIn1.”
To activate the Match-code teach-in mode, use Ext. Input 1. Make certain this is available to you. To check, go into Parameters > Network / Interface / IOs > Digital Input to determine what inputs are available.
Wire a normally open pushbutton into the connection module to the terminals that correspond to the Ext. Input 1 (in the CDM420 it is terminal 18 for AUX In 1 to +24V DC terminal 29).
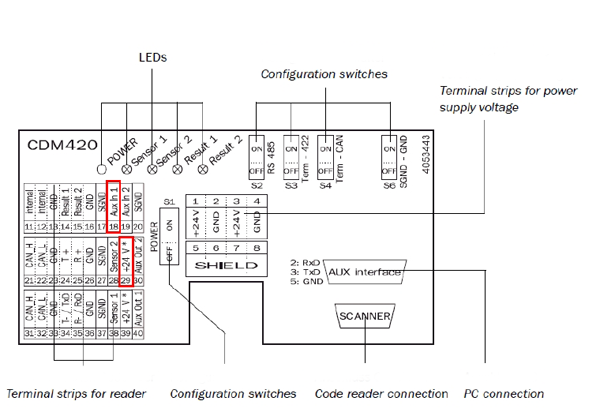
(in the CDB it is terminal 16 for In 1 to +24V DC terminal 14)

With the configuration above,
- Activate the Match-code teach-in mode by closing the contact using the pushbutton and maintaining the signal on Ext. Input 1 (AUX In 1 in the CDM or In 1 in the CDB)
- Place the barcode label in front of the CLV650
- Trigger Sensor 1 (which is used to open the barcode reading gate) to scan a barcode label
- After the barcode reader has scanned the label, close its reading gate
- De-activate the Match-code teach-in mode
Verify the code was taught into the barcode reader correctly by going into Parameter > Data Processing > Evaluation Conditions
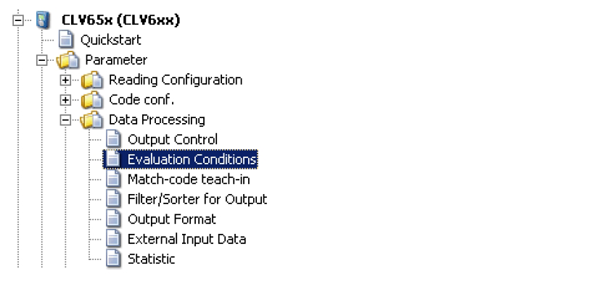
Upload from the scanner.
The Evaluation Condition “TeachIn1” will show the taught-in barcode.
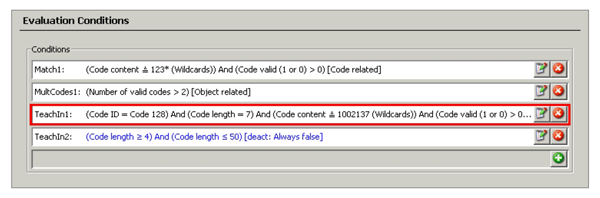
The barcode taught into the evaluation condition can be used for comparison to match what was taught to barcodes being scanned. The evaluation condition can be used to annunciate a discrete output or to sort the output data.
For additional information, download the following pdf: Match Code Teach-in.